CPV Lab - First Steps
This guide walks you through everything you need to configure after installing CPV Lab (opens new window) on your server - from your first login to having your tracker fully set up and ready for campaigns.
⚙️ This guide is for CPV Lab (self-hosted) users only.
☁️ If you are using CPV One (cloud-hosted), see CPV One - First Steps.
Before You Start
Make sure your server meets the minimum requirements:
| Requirement | Minimum |
|---|---|
| PHP version | 8.1 or higher |
| MySQL version | MySQL version 5.6.3 or above / MariaDB version 10.0.12 or above |
| ionCube Loader | ionCube Loader 13.0 or newer |
| Server access | cPanel, SSH, or hosting control panel |
| Server Space | Minimum 500 MB of Disk Space |
⚠️ PHP 8.1 is required. Earlier PHP versions are not supported in the current version of CPV Lab. If your server is running an older PHP version, update it before proceeding.
⚠️ ionCube Loader must be installed and match your PHP version. If there is a version mismatch, CPV Lab will not load. See Troubleshooting Common Issues if you encounter ionCube errors.
Quick Summary
- Step 1 - Log In for the First Time
- Step 2 - Change Your Password and Username
- Step 3 - Set Your Timezone
- Step 4 - Set Default Capture Options
- Step 5 - Add Your Offer Sources
- Step 6 - Add Your Traffic Sources
- Step 7 - Set Up a Custom Tracking Domain (Recommended)
- Step 8 - Add SSL Certificate (Recommended)
- Step 9 - Set Up Cron Jobs
- Step 10 - Import Mobile Carriers (Optional)
Step 1 - Log In for the First Time
Open your browser and go to your CPV Lab login page:
http://your-cpvlab-domain.com/login.php
Replace your-cpvlab-domain.com with the domain where you installed CPV Lab.
Your default login credentials after a fresh install are:
- Username:
admin - Password:
admin
⚠️ Change your default credentials immediately after first login. The default admin/admin credentials are publicly known. Leaving them unchanged is a security risk.
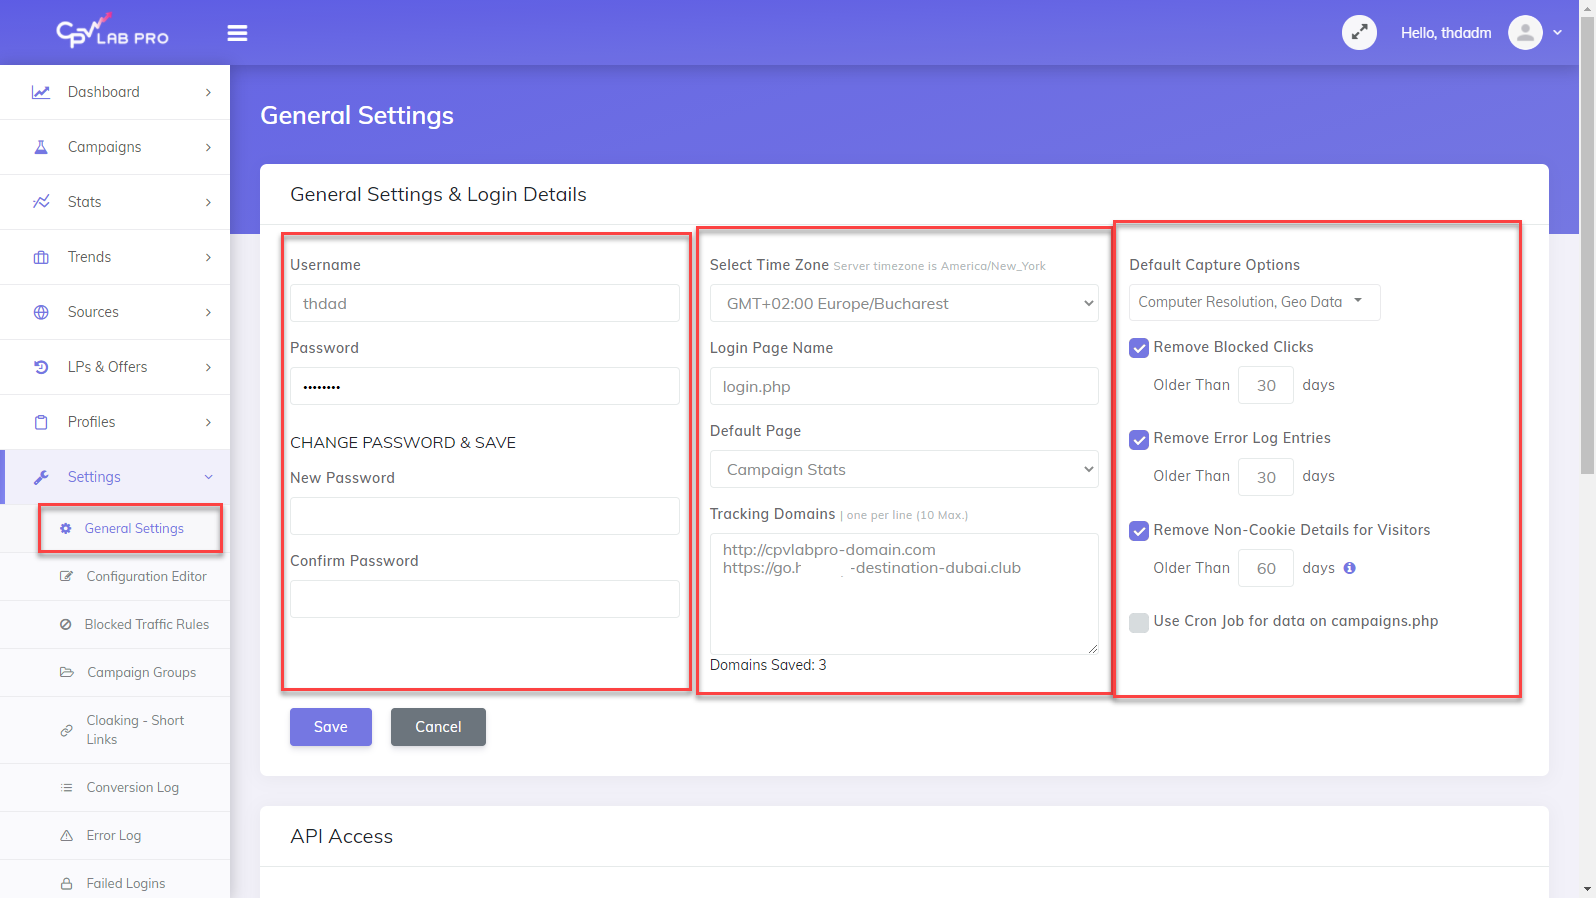
Step 2 - Change Your Password and Username
- Go to Settings ➡️ General Settings.
- Find the Login Details section.
- Update the following:
- Username - change from
adminto something unique - Current Password - enter
admin - New Password - enter a strong, unique password
- Confirm Password - repeat the new password
- Username - change from
- Click Save.
💡 Use a password manager to generate and store a strong password. Your CPV Lab dashboard contains all your campaign data - protect it.
Step 3 - Set Your Timezone
- Go to Settings ➡️ General Settings.
- Find the Timezone dropdown.
- Select your local timezone.
- Click Save.
Step 4 - Set Default Capture Options
Capture Options control what visitor data CPV Lab records for every click. Set your defaults here once and override per campaign when needed.
- Go to Settings ➡️ General Settings.
- Find the Default Capture Options section.
- Enable the options you want:
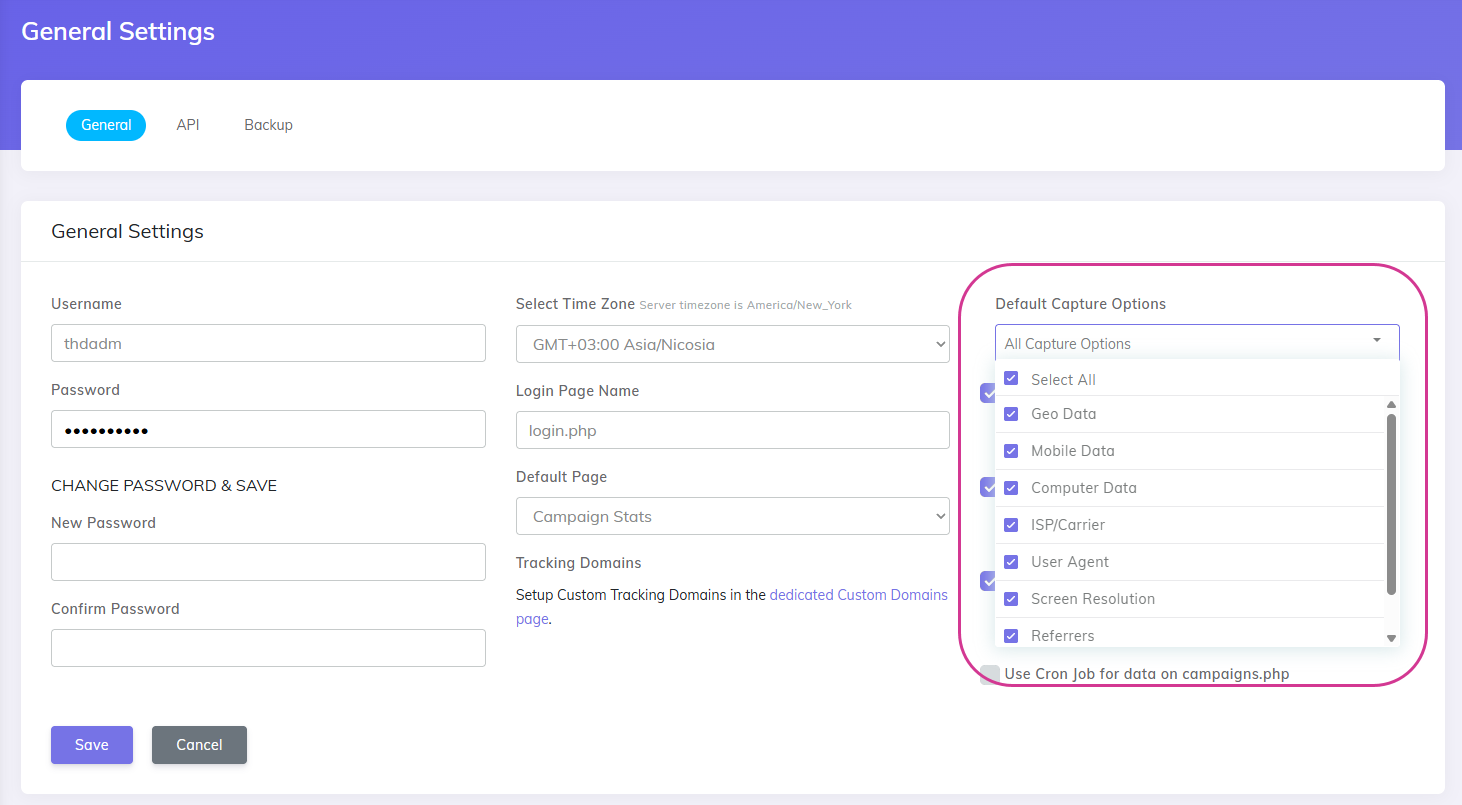
| Option | What it captures | Recommended |
|---|---|---|
| Computer Data | Browser type and version for desktop visitors | Yes |
| Computer Resolution | Screen resolution for desktop visitors | Optional |
| GEO Data | Country, state, city, continent | Yes |
| ISP / Carriers | Internet provider and mobile carrier | Yes |
| Mobile Data | Mobile device, OS, and browser data | Yes |
| Referrers | The domain and page the visitor came from | Yes |
| User Agent | Full browser and device string | Yes - required for CAPI |
- Click Save.
💡 Enable User Agent capture if you plan to use Facebook CAPI, TikTok CAPI, or Google Ads conversion tracking. It is required for accurate server-side event matching.
Step 5 - Add Your Offer Sources
An Offer Source is the affiliate network or platform you are promoting offers from. CPV Lab comes with 200+ networks pre-configured in the catalog.
- Go to Sources ➡️ Offer Sources.
- Click Import from Catalog.
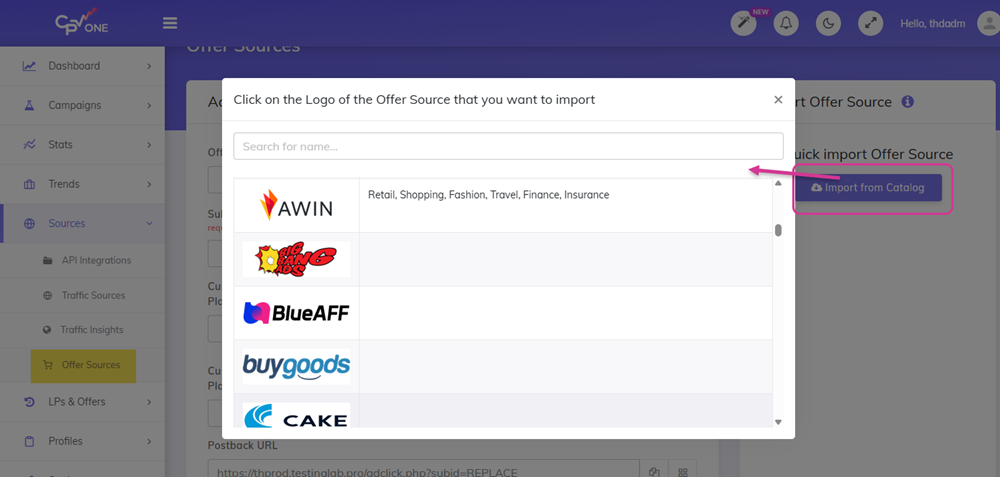
- Search for your affiliate network by name.
- Click on it to load the pre-configured settings.
- Review the settings - the postback URL and SubID token are pre-filled automatically.
- Click Save.

Repeat for each affiliate network you use.
💡 Copy the Postback URL shown on the offer source settings page. Paste it into your affiliate network's S2S settings so it can notify CPV Lab when a conversion happens.
💡 Your network not in the catalog? You can add it manually using the SubID token name from your network's documentation. See Offer Sources guide.
Step 6 - Add Your Traffic Sources
A Traffic Source is the ad network you are buying traffic from. CPV Lab comes with 150+ traffic sources pre-configured in the catalog.
- Go to Sources ➡️ Traffic Sources.
- Click Import from Catalog.
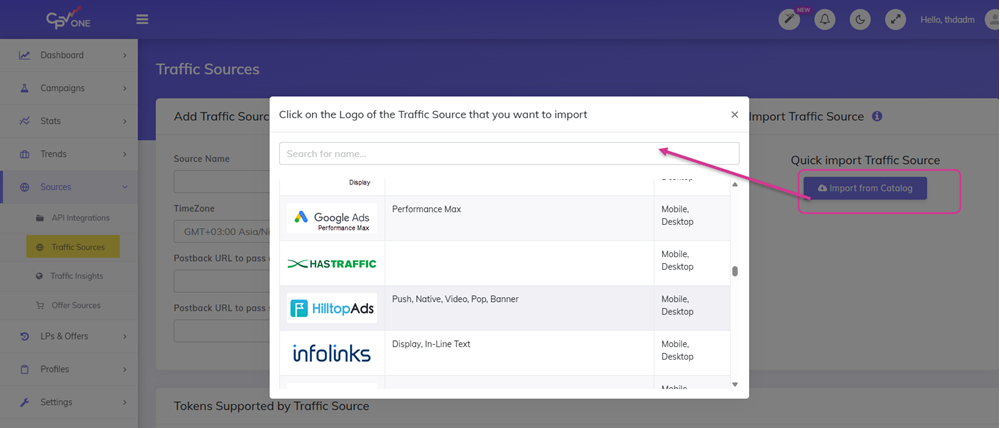
- Search for your traffic source by name.
- Click on it to load the pre-configured settings.
- All tracking tokens are pre-filled - no manual setup needed.
- Click Save.
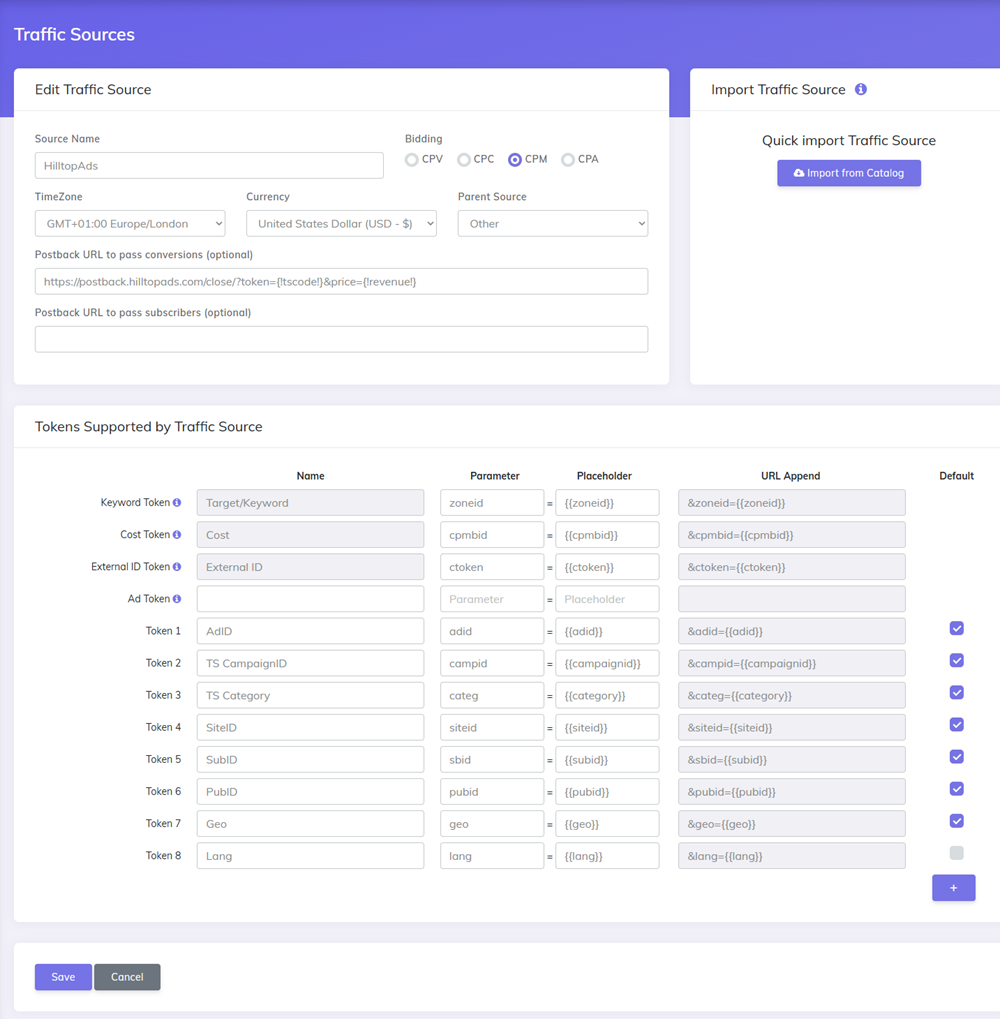
Repeat for each traffic source you use.
💡 Predefined Tokens: When setting up a traffic source, select which tokens should always be pre-selected in the campaign setup for that source. This saves time when creating multiple campaigns. See Predefined Tokens for Traffic Sources.
Step 7 - Set Up a Custom Tracking Domain (Recommended)
By default, your CPV Lab tracking links use the domain where CPV Lab is installed. A custom tracking domain lets you use a different domain in your campaign URLs and tracking links.
Why this matters:
- Your tracking links look more trustworthy to ad networks and visitors
- Some traffic sources (like Google Ads) require the campaign URL domain to match the landing page domain
- First-party tracking - use a subdomain of your landing page domain for better data accuracy
- Protects campaigns from ad blockers that target known tracker domains
→ Follow the full guide: Custom Tracking Domains

Step 8 - Add SSL Certificate (Recommended)
SSL enables https:// on your tracking domain. Without it, your pixels and postback URLs start with http:// - which many modern affiliate networks and ad platforms reject.
Why this matters:
- Required by most affiliate networks for postback URLs and pixels
- Required for Facebook CAPI, TikTok CAPI, and Google Ads tracking
- Browsers flag
http://pages as "Not Secure" - this can hurt landing page conversions
→ Follow the full guide: Add SSL Certificate
Step 9 - Set Up Cron Jobs
Cron jobs are scheduled tasks that run automatically on your server. CPV Lab uses them for several important background functions:
| Cron job file | What it does | Recommended frequency |
|---|---|---|
cron.php | Cleans up old data, runs maintenance tasks | Every hour |
cron-api-integrations.php | Pulls cost data from Google, Facebook, TikTok, and other API integrations | Every hour |
cron-wurfl.php | Updates mobile device detection database | Once per day |
How to set up a Cron job in cPanel:
- Log in to your hosting control panel (cPanel).
- Find the Cron Jobs section.

- Add a new Cron job with the following settings:
- Frequency: Once per hour (or as specified above)
- Command:Replace
cd /home/your-server-username/public_html/; php cron.phpyour-server-usernamewith your actual server username andpublic_htmlwith the folder where CPV Lab is installed.

- Click Save to activate the Cron job.
- Repeat for each Cron job file listed in the table above.
⚠️ Make sure Cron jobs run using PHP 8.1. On servers with multiple PHP versions, Cron jobs sometimes default to an older version. If your Cron jobs fail with a PHP error, see Troubleshooting Common Issues for how to specify the correct PHP path.
💡 API integrations only: If you are using cost synchronization with Google Ads, Facebook, TikTok, or other platforms,
cron-api-integrations.phpmust be running for costs to update automatically in your reports.
Step 10 - Import Mobile Carriers (Optional)
This step pre-loads the mobile carrier database into CPV Lab. Without it, mobile carrier data is still captured correctly - but each new carrier requires an extra database lookup. For high-volume traffic, pre-loading the database improves performance.
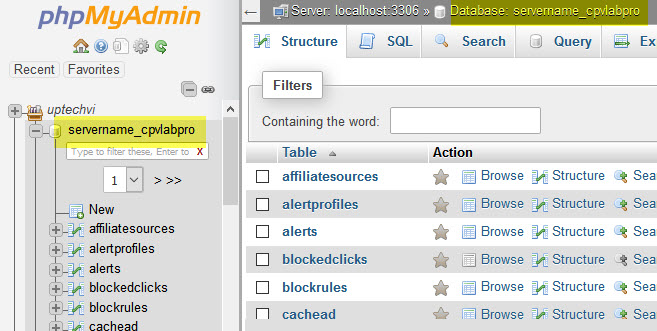
- Log in to phpMyAdmin from your cPanel.
- Select your CPV Lab database from the left sidebar.
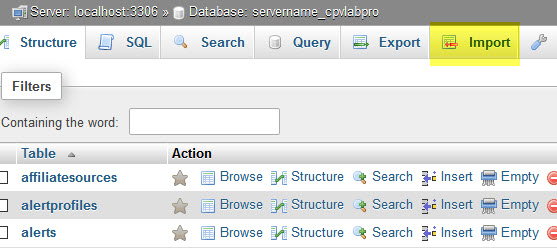
- Click the Import tab.

- Click Browse and select the file
cpvlabpro-carriers.sqlfrom your CPV Lab installation package.
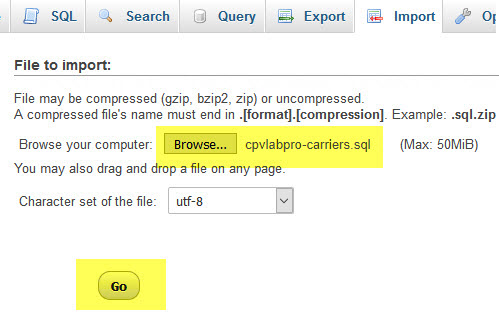
- Click Go to run the import.
- Wait for the confirmation message.
💡 This step is optional but recommended if you are running high volumes of mobile traffic. It reduces database load and speeds up carrier detection.
Your Setup Checklist
With these steps complete, CPV Lab is fully configured.
- [ ] Default admin password changed
- [ ] Timezone set correctly
- [ ] Default capture options enabled
- [ ] Offer sources added
- [ ] Traffic sources added
- [ ] Custom tracking domain configured (recommended)
- [ ] SSL certificate installed (recommended)
- [ ] Cron jobs active
- [ ] Mobile carriers imported (optional)
Next step - create your first campaign:
Frequently Asked Questions
What PHP version does CPV Lab require? PHP 8.1 or higher. Earlier PHP versions are no longer supported in the latest releases.
Do I need ionCube Loader installed? Yes. CPV Lab uses ionCube for license protection. Make sure the ionCube Loader version matches your PHP version. See Troubleshooting Common Issues if you get an ionCube error.
What is the default login after installation?
Username: admin / Password: admin. Change both immediately after your first login.
My Cron job is failing - what do I do? The most common cause is the Cron job running on a different PHP version than the one used for the files. See Troubleshooting Common Issues for the fix.
Can I use CPV Lab on shared hosting? Yes, but a VPS or dedicated server is recommended for performance, especially at high traffic volumes. Make sure your shared hosting plan supports PHP 8.1 and allows Cron jobs.
You may also find useful: