7SearchPPC Integration with CPV Lab | CPV One
This is a step-by-step guide showing how to:
- Set up 7SearchPPC as a traffic source in CPV Lab or CPV One
- Create a campaign and connect it to your 7SearchPPC account
- Set up S2S postback tracking so conversions flow between both platforms automatically
- Test the integration before sending live traffic
☁️ This guide uses CPV One in the examples. The steps are identical for CPV Lab (opens new window).
Who is 7SearchPPC?
7SearchPPC (opens new window) is a self-serve pay-per-click ad network built for performance marketers. It specializes in high-intent search and display traffic across multiple verticals.
Ad formats available:
- Text Ads (Search PPC)
- Native Ads
- Display / Banner Ads
- Pop-under Ads
- In-Page Push Ads
- Video Ads
Key verticals: Finance, iGaming, Dating, eCommerce, Health, Crypto, VPN, Travel, eLearning, and more.
Why use 7SearchPPC with CPV Lab | CPV One:
- ✅ S2S postback tracking — accurate, cookieless conversion tracking
- ✅ Real-time data — see clicks and conversions the moment they happen
- ✅ Pre-configured in the CPV Lab Traffic Source Catalog — no manual token setup
- ✅ Send conversions back to 7SearchPPC for algorithm optimization
- ✅ Track ROI, CPC, and conversion rate per campaign inside CPV Lab
Before You Start
Make sure you have the following in place:
- An active CPV One (opens new window) or CPV Lab (opens new window) account
- An active 7SearchPPC Advertiser account
- At least one offer or product to promote
- A landing page ready (if your campaign uses one)
- An affiliate network account (if you are an affiliate marketer)
Quick Summary
- 7SearchPPC Integration with CPV Lab | CPV One
- Who is 7SearchPPC?
- Before You Start
- Quick Summary
- Step 1 - Get the 7SearchPPC Postback URL
- Step 2 - Add 7SearchPPC as a Traffic Source in CPV Lab
- Step 3 - Add Your Offer Source
- Step 4 - Add Your Offers and Landing Pages
- Step 5 - Create Your Campaign in CPV Lab
- Step 6 - Test Your Postback Tracking (optional)
- Step 7 - Create and Launch Your Campaign on 7SearchPPC
- What You Will See in CPV Lab After Launch
- Troubleshooting
Step 1 - Get the 7SearchPPC Postback URL
Before setting up CPV Lab, get the Postback URL from your 7SearchPPC account. You will need it in the next step.
- Log in to your 7SearchPPC Advertiser account (opens new window).
- Go to the 7SearchPPC website, click Log In, select As an Advertiser, and enter your credentials.
- In the sidebar, go to Tracking.
- From the list of available trackers, select CPV Lab.
- Scroll down and copy the Postback URL.
![]()
💡 Keep this Postback URL open in a separate tab. You will paste it into CPV Lab in the next step.
Step 2 - Add 7SearchPPC as a Traffic Source in CPV Lab
7SearchPPC has a pre-configured template in the CPV Lab | CPV One Traffic Sources Catalog.
All tokens and parameters are already set up — you just need to import it and add the Postback URL.
- Log in to your CPV Lab or CPV One account
- Go to Sources ➡️ Traffic Sources from the sidebar
- Click Import from Catalog
- Select 7SearchPPC from the list

- The traffic source settings will load automatically with all tokens pre-filled.
- Find the Postback URL field and replace the default URL with the one you copied from 7SearchPPC in Step 1 (or simply replace the parameter with *Replace).
- Review the other settings:
- Source Name — keep as 7SearchPPC or rename it
- Timezone and Currency — match your 7SearchPPC account settings
- Tokens — pre-filled from the catalog, no changes needed
- Click Save.

✅ 7SearchPPC is now set up as a traffic source in CPV Lab. Every campaign you create with this traffic source will use these settings automatically.
Step 3 - Add Your Offer Source
If you are promoting offers through an affiliate network, you need to add it as an Offer Source in CPV Lab.
💡 Running your own offer or ecommerce store? Skip to Step 4.
- Go to Sources ➡️ Offer Sources from the sidebar.
- Click Import from Catalog.
- Search for your affiliate network and select it.
- Once the settings load, find the Postback URL shown on this page.
- Copy the Postback URL and paste it into your affiliate network's postback settings — this allows your affiliate network to notify CPV Lab when a conversion happens.
- Click Save.

⚠️ The SubID token is mandatory. It links each conversion back to the correct click in CPV Lab. Your affiliate network provides the SubID token — it is pre-filled automatically when you import from the catalog.
💡 Your network not in the catalog? Add it manually. You will need the SubID token name from your network's documentation. See Offer Sources setup guide for details.
Step 4 - Add Your Offers and Landing Pages
Before creating a campaign, add your offers and landing pages to CPV Lab. Once added, you can reuse them across multiple campaigns.
Add Your Offer
- Go to LPs & Offers ➡️ Offer Management.
- Click Add New Offer.
- Fill in the details:
- Offer Name — something clear and recognizable (e.g. 7SearchPPC - Finance Lead - US)
- Offer Source — select the affiliate network you set up in Step 3
- Offer URL — paste the offer URL from your affiliate network. Make sure the SubID parameter uses
{!subid!}as its value - Payout — enter the offer payout amount
- Click Save.

💡 Bulk import available: If you have multiple offers, use the Bulk Import feature to upload them via a CSV file. See Offer Management guide. Promoting your offers? If you promote your own offer, add the offers here and select "In-house" as offer source.
Add Your Landing Page
- Go to LPs & Offers ➡️ LPs Management.
- Click Add New Landing Page.
- Fill in the details:
- Landing Page Name — e.g. Finance LP v1
- Landing Page URL — the full URL of your landing page
- Click Save.
💡 No landing page? You can run a direct link campaign — traffic goes straight from your 7SearchPPC ad to the offer. Select Direct Link when setting up your campaign in the next step.
Step 5 - Create Your Campaign in CPV Lab
With your traffic source, offer source, offers, and landing pages ready — create your tracking campaign.
- Go to Campaigns ➡️ Add New Campaign from the sidebar.
- Select the type of campaign you want to use
- For this example we will use Direct Link and Landing Page

Campaign Settings
- Fill in the General Campaign Settings:
- Campaign Name — e.g. 7SearchPPC - Finance Lead - US - v1
- Tracking Domain — select your tracking domain
- Campaign Type — choose based on your funnel:
- Direct Link — traffic goes directly to the offer, no landing page
- Landing Page — traffic goes through your landing page first
- Split — A/B test two or more landing page or offer variations

Networks and Pages
- In the Traffic Source dropdown, select 7SearchPPC.
- Set your Bid and Cost — match the CPC or CPM you are bidding on 7SearchPPC.
- Select your Landing Page (if using one) and your Offer.
- Make sure the percentage share for landing pages / offers adds up to 100%.
- Click Save & AI Validation.

Tracking Links
- On the Tracking Links page you will see your Campaign URL.
- Copy it — you will need it to test tracking and to create your campaign on 7SearchPPC.
![]()
- Make sure checkbox: "Use Traffic Source Postback URL to mark conversions at your Traffic Source" is checked
- This tells CPV Lab to automatically notify 7SearchPPC every time a conversion is recorded.
⚠️ It is automatically checked, but should review it. Without it, CPV Lab will track conversions internally but 7SearchPPC will not receive the signal. The 7SearchPPC algorithm cannot optimize your campaign without conversion data.
✅ Your campaign is now created. It will appear in your Campaigns list.
Step 6 - Test Your Postback Tracking (optional)
Always test the integration before sending real traffic. This confirms that clicks and conversions are being recorded correctly in both platforms.
- Log in to your 7SearchPPC Advertiser account.
- Go to Tracking from the sidebar.
- Click the Test Conversion tab.
- Paste the Campaign URL you copied from CPV Lab into the Test Conversion field.
- Click the Test Conversion button.

- You will be redirected to your campaign landing page or offer page. Complete the required action (e.g. submit a form, sign up, or complete a test purchase).
- Navigate back to your 7SearchPPC Tracking page. If the setup is correct, a conversion will appear on the dashboard within 2-3 minutes.
- Also check your CPV Lab campaign report — you should see both a click and a conversion recorded there.

✅ Conversion appears in both platforms? Your integration is working. You are ready to launch live traffic.
❌ No conversion showing? Check these common causes:
- The Postback URL in the 7SearchPPC Traffic Source settings is incorrect — re-copy it from 7SearchPPC and re-paste it in CPV Lab (Step 2)
- The Traffic Source Postback URL checkbox was not enabled in the campaign setup (Step 5)
- The SubID token in your offer URL is missing
{!subid!}— check your offer settings (Step 4)- Check the Postback Log in CPV Lab for detailed error information
Step 7 - Create and Launch Your Campaign on 7SearchPPC
With tracking confirmed, create your live ad campaign on 7SearchPPC.
- Log in to your 7SearchPPC Advertiser account.
- Go to Campaigns from the sidebar.
- Click the Create button in the top-right corner.
- Select your Ad Format and click Start.

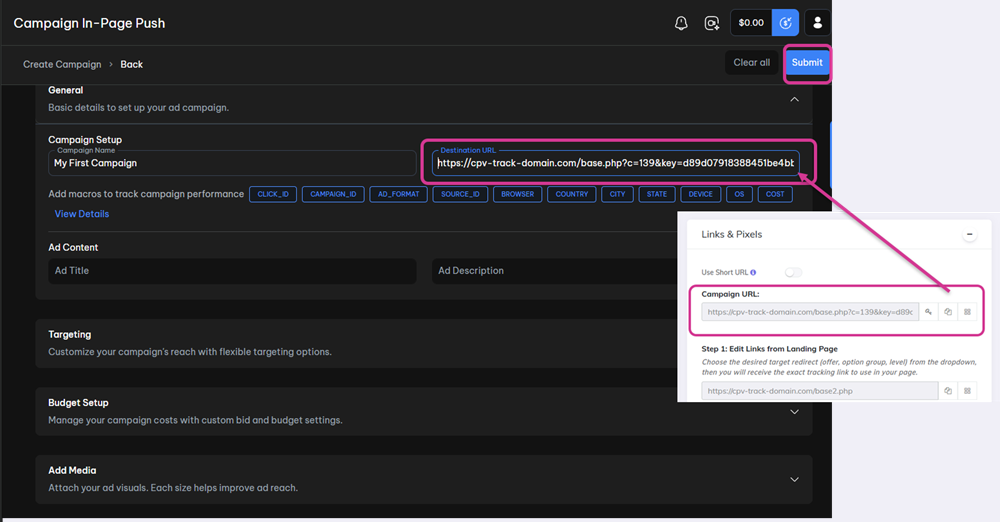
- In the Destination URL field, paste the Campaign URL from CPV Lab.
- Fill in all required campaign details:
- Campaign Name
- Ad Title and Description
- Targeting (GEO, device, vertical)
- Bids and daily budget
- Review all details carefully, then click Submit.
✅ After submission, 7SearchPPC will review your campaign. You will receive a "Campaign Successfully Approved" email when it goes live.
💡 Once live, all clicks and conversions will appear in real time in your CPV Lab campaign reports. Conversions will also be sent automatically back to 7SearchPPC for algorithm optimization.
What You Will See in CPV Lab After Launch
Once traffic is running, your CPV Lab campaign report will show:
- Visits — every click from 7SearchPPC
- Conversions — every confirmed conversion from your offer or affiliate network
- Cost — spend from 7SearchPPC (real time, automatically recorded)
- Revenue — payout per conversion passed by your affiliate network
- ROI — calculated automatically from cost and revenue
- Device, GEO, and token breakdowns — drill down by country, device type, and any tracked tokens

Troubleshooting
Clicks are not showing in CPV Lab.
- Check that the Campaign URL from CPV Lab is correctly pasted in the 7SearchPPC Destination URL field.
- Confirm the campaign is active on 7SearchPPC.
- Check your CPV Lab campaign status — make sure it is not paused.
Conversions are not showing in CPV Lab.
- Check that the Postback URL in your affiliate network is correctly set (Step 3).
- Confirm the SubID token (
{!subid!}) is in your offer URL (Step 4).
Conversions are not showing in 7SearchPPC.
- Check that the Traffic Source Postback URL checkbox is enabled in your campaign setup (Step 5).
- Check that the Postback URL in the 7SearchPPC Traffic Source settings matches what 7SearchPPC provided (Step 2).
The 7SearchPPC postback test fails.
- Wait 2-3 minutes and refresh the 7SearchPPC Tracking page.
- Check the Postback Log in CPV Lab — it shows every postback received and any error details.
- Contact 7SearchPPC support if the issue persists.
You may also find useful: